Ornamental Fence Installation
Malden Metals step by step ornamental fence installation
Tools
- Rubber Mallet
- Cordless Impact Drill
- String Line & Marker Pegs Or Spray Paint
- Magnetic Level
- Post Hole Digger
- Tape Measure
- Spade Shovel
- Wheelbarrow
- Magnetic Hex Driver
- Quick Set Concrete Mix
- Cordless Zip Disk/Hacksaw
Safety Tools
- Steel Toe Boots
- Work Gloves
- Safety Glasses
- Earmuffs Or Earplugs
1. Getting Started
Here are some tips before you get started on your fence installation project. Read though the entire installation instructions before you begin. Prevent the fencing material from getting scratched by keeping it in the packaging until needed and set it down on level and smooth surface. Some cutting of the fence components will probably be required. Use a zip disk/ Hacksaw to cut. Call all your local utilities to mark any underground lines. Do not start to dig holes until you know where any buried lines are. Find out where your property lines are.
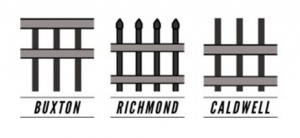
2. Style Options

3. Digging Your Holes
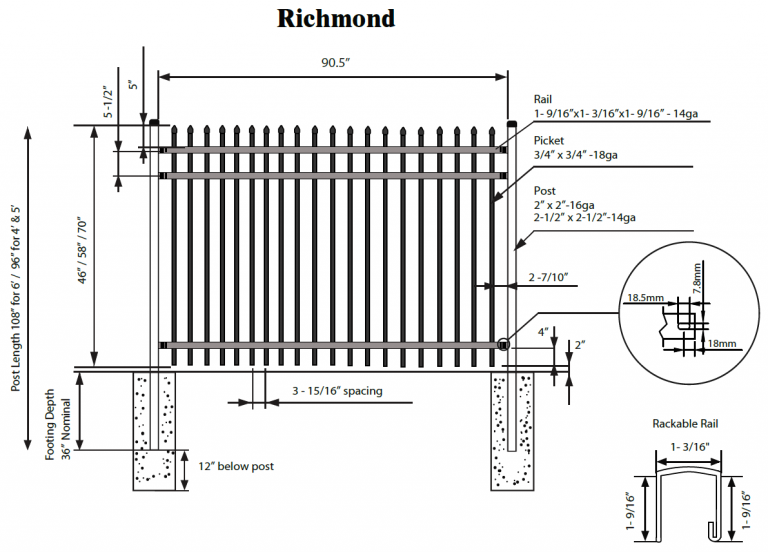
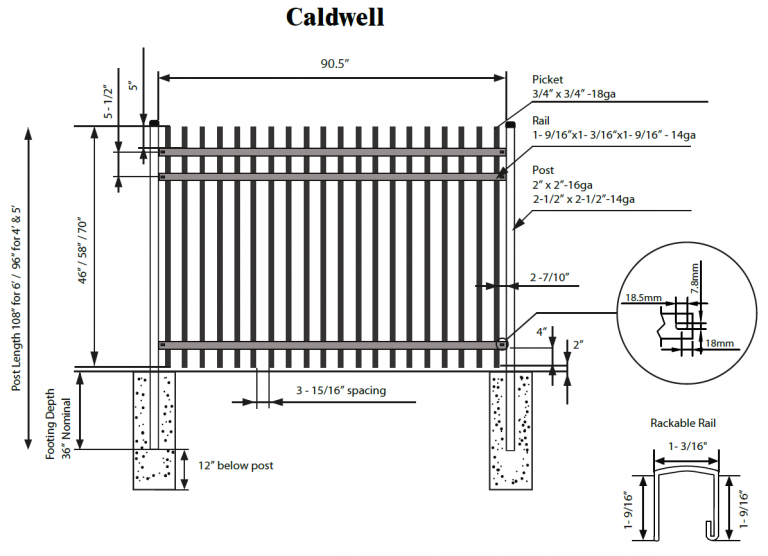
Make sure all underground lines have been marked before digging begins. The ideal spacing, center to center of posts is, 93” for 2” posts and 93 ½” for 2-1/2” post for an 8′ section. If the fence is installed on a slope the distance will have to be shorter dependent on the slope. Start by laying out your fence posts to determine the best fit for the last couple sections in your run. Pound a marker peg on each end of the fence length. Place a string line around the two pegs to ensure a straight line. Measure and make a mark with a peg or spray paint for every post. The distance from center of post to center of post is 95” for 2” posts and 96” for 2- ½” posts. Dig each post hole 48” down and fill the bottom 12” of your hole with concrete. Your post should sit 12” off the bottom of the hole. Use a string line to align fence vertically and a magnetic level to set your posts so they are plumb. Back fill the hole with concrete until it is 2” below grade. This will allow for some movement of the concrete before it is above grade. Do this for each post and let dry.
4. Decide Which Bracket’s Will Be Used
There are 3 types of brackets that can be used to install an ornamental steel fence on a straight line. Pictured Below:
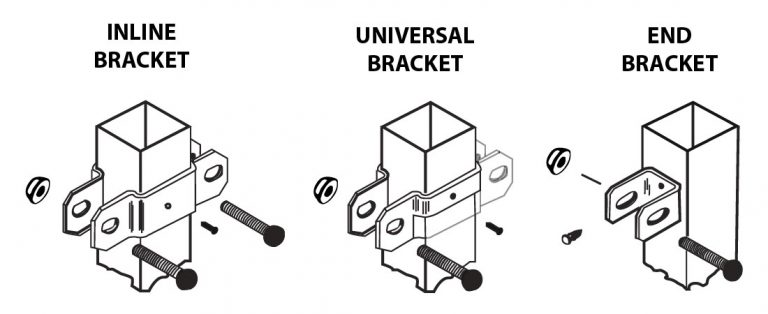
5. Securing The Brackets
Once your posts are set you will need to fasten your brackets to them. You will use self-tapping hex head screws and the nut and bolt combination provided, depending on the style of bracket chosen. Hand-tighten the fasteners. This will allow you to make adjustments after the panels are attached to the brackets. Measure the reveal at the bottom of the panel. It should be 2” from the ground to the bottom of the panel. Measure the distance from picket to post to make sure both sides are the same.
Universal Bracket
You will need to place your brackets accordingly on each post. The universal bracket will be slid over the post and aligned with the panel. Screw the bracket in place on either side of the post. Secure the panel to the universal bracket with the nut and bolt combination provided. The universal brackets can be stacked in alternating directions because they are offset.
Inline Bracket
Position panel to line post and align rail with one side of the post. Secure panel to bracket using the nut and bolt combination provided. Make sure panels are level with grade and secure them to post using a self-tapping hex head screw.
End Mount Bracket
Use a tape measure to layout the correct bracket location on the post. Attach end mount bracket to post using a cordless drill and hex head driver. Secure panel to bracket using the nut and bolt combination provided.
6. Cutting Or Trimming Panels/Posts
Use a tape measure to find the post spacing and make a mark on your panel. Use masking tape to mark your line. Cut on the outside edge of the masking tape with a hacksaw or zip disk. Use your file to shave off any rough edges. Mark a new bracket hole and drill through both side of the rail. Peel off tape and use your Malden Metals touch up paint pen. Make sure you cover your cut area and let dry. The panel is ready to be installed.
7. Installing Fence Panels On A Slope
Make sure your post spacing is accurate. The larger the slope, the shorter the panel will be. The rackable panels can be racked up to 40 degrees. There are two ways to install a rackable fence on a slope.
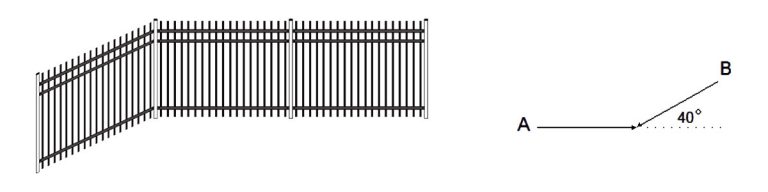
Option 1:
Adjust the panel to be parallel to the grade and pull your panel up hill until your slope is determined.
Option 2:
Attach panel to the post on the up-hill side then pull panel to the downhill bracket.
Fasten your nut and bolt combination provided.
8. Enjoy Your New Fence
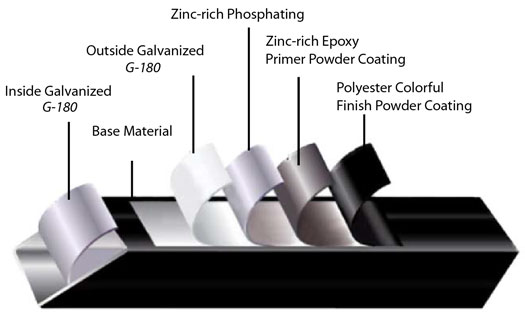
True Guard™ Protection System
- To prevent rusting from base material, all of our products are galvanized and have a Zinc Mass of 180g inside and out.
- To ensure superior adhesion, each of our products undergo seven stages of pre-treatment with zinc-rich phosphate.
- To cover all welds and cut edges, zinc-rich epoxy primer powder coating are applied to all our products.
- To achieve exceptional anti-corrosion and weather resistant performance, polyester finish powder coating are administered to our products.
More Layers, More Protection